Posts tonen met het label DIY. Alle posts tonen

maandag 16 april 2012

Hooked iPhone case


My iPhone has had an encounter with miss Gravity... it was not love at the first sight! While I am waiting for my date with the magic repair man I decided to make sure that it could not get worse. Hooked a case from leftovers from the 'Happy Hooked Hats'. Nice, soft and thick.. and therefore shock proof :). For the inside I made a small bag to prevent the wool fabric to stretch and my phone to drop out :).


maandag 12 maart 2012

Happy Hooked Hats!

A sudden inspiration to hook hats on my ski trip :)...

woensdag 8 februari 2012

Another cushion cover

Made another one :)! Just like the others, this one is available for Dutchies on marktplaats. Click here to find this one on marktplaats :).

woensdag 25 januari 2012

Home made cushion covers


Redecorating my room also ment new bed linen, and new bed linen ment new cushion covers! Because redecorating is not a cheap business I made my new cushion covers myself. The fabric is officially supposed to be used for curtains, so it is thick, good quality. The golden covers are nice and shiny, the black ones are soft because it is a wool-fabric.

Now, because not all of you are as handy with a sewing machine or too busy to be... I have also put them up for sale. For the Dutchies among you, they are on Marktplaats.


For the black one, click here (sold out).


For the golden one, click here.


-x-

dinsdag 20 december 2011

Have a home made christmas :)

All you need: christmas ribbons, a candle, cinnamon sticks, fake cherries/berries, mushrooms and red peppers or anything else! Put it all together on a nice garland (a real one, please!!), use iron strings to secure the decorations.. and voila! Ho Ho Ho... Merry Christmas!

zondag 23 oktober 2011

Wreck a Bag!

I like canvas bags, I do. But I never use them, because most of them are boring... Last week I bought a new jacket and it came with a black canvas bag. Black! Always better than white :). However, as you can see, there was a logo on it. A big screeming-blue logo. Not so nice. So I gathered leftovers and plastified a Vivienne Westwood picture and started to wreck the Kelly-bag ;)! Due to a lack of wreck-time, it's not totally wrecked jet... hope to finish next week :). But I just wanted to share this new look of the first canvas bag I actually intent to use ;)!
To be continued...

zaterdag 9 juli 2011

Another pimped-up notebook!

I once received this little notebook as a gift, of course without the funny cover ;). The original cover was a dull one! So with some help of pictures out of magazines, gold ribbon, shine through yellow/gold ribbon and glue... I turned it in to a fancy notebook :)!


Een tijdje geleden kreeg dit kleine notitieboekje cadeau, zonder deze kaft natuurlijk ;). De originele kaft was niet veel bijzonders! Dus met behulp van plaatjes uit tijdschriften, goud lint, doorzichtig geel/goud lint en lijm... heb ik er wel een leuk notitieboekje van gemaakt :)!


dinsdag 28 juni 2011

Roll-up photo frame :)!

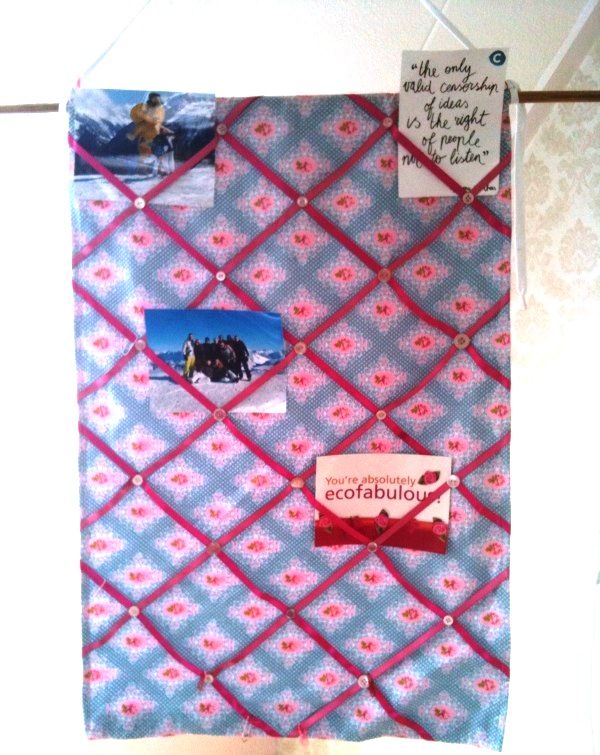
This is a photo taken in my room in Austria last winter. I stayed there for a couple of months as a ski instructor :). I have had the time of my life there ;) (well.. at least till so far :P). Anyway! I wanted to have something to remember home while being away. Something where I could stick pictures in and collect my postcards. But! A large photo frame wouldn't work... how do you fit that in your suitcase/backpack? Noo idea, so I made a photo-frame-like thing that can be rolled up :). Because I received lots and lots of postcards it is a bit messy in this picture... but there is a really sweet coloured fabric behind it ;)! Scroll down for those pictures :). Now... if you want to make such a thing all you need is a patch of fabric (size is all yours) in a colour you love, ribbon, buttons and a wooden staff. It is easy... just take a close look at the pictures or ask me if it is not clear :)! I'll be happy to help you :)!

De foto bovenaan is genomen in mijn kamer in Oostenrijk afgelopen winter. Ik ben daar een paar maanden geweest om skiles te geven :). Heb daar de tijd van m'n leven gehad ;) (tenminste.. tot nu toe :P). Maargoed! Ik wilde iets hebben waarmee ik toch een stukje thuis mee had. Iets waar ik foto's in kwijt kon en ook de eventuele kaartjes van het thuisfront. Een grote fotolijst was geen optie... hoe stop je die in je koffer of rugzak? Geen idee! Uiteindelijk is het een fotodoek geworden dat opgerold kan worden :). Omdat ik heel veel kaartjes heb gekregen van het thuisfront ziet hij er rommelig uit op de bovenste foto, maar hiernaast is hij te bewonderen in een legere staat ;). Ik vond het stofje super leuk, maar daar zie je dus niks van terug als je hem vol hangt haha! Als je ook zoiets wil maken dan is het enige wat je nodig heb een leuk stuk stof (hoe groot dat bepaal je zelf), lint, knopen en een houten stokje. Het is vrij gemakkelijk om hem in elkaar te zetten.. goed kijken naar mijn foto's en mocht je er toch niet uit komen, geen probleem! Ik help je graag :)!

donderdag 9 juni 2011

DIY: Etos Zomerbandjes net even anders

I am really sorry but this one is only in Dutch...
Jullie hebben ze vast al gezien in een van de Etos boekjes, of misschien ben je al de trotse eigenaresse van een paar exemplaren ;)... de Etos zomerbandjes! Ik heb gister even groots ingeslagen en kreeg daarbij twee armbandjes. Bij het open maken grote teleurstelling... twee dezelfde! Wat moet ik daar nou weer mee :(... Een overactief hoofd was natuurlijk weer het gevolg haha! Na een paar proefjes kwam ik op dit exemplaar uit. Wat je nodig hebt is simpel. Twee Etos zomerbandjes, wat ringetjes, een slotje en twee extra touwtjes. Voor die extra touwtjes heb ik ophanglusjes uit een vestje gebruikt (die dingen zitten toch altijd in de weg en waren lang genoeg :) ). Je knoopt de twee extra touwtjes met een ringetje in het midden van de twee zomerbandjes. Vervolgens vlecht je de zes draden in elkaar. Aan het einde maak je een grote knoop van de zomerbanddraadjes en aan het uiteinde van de extra touwtjes knoop je het slotje vast. Vergeet niet om deze knoopjes goed vast te 'plakken' met doorzichtige nagellak :)! En klaar is crea! Good good luck :D!


donderdag 2 juni 2011

DIY: The Notebook PartII - The Birkin-bag like wrap

Isn't he cute :)? I am a big fan of the Birking bag, but of course it is way to expensive for me haha! Never mind, my notebook received the Birkin-bag look today :). It is hooked with wool and finished with cotton and a key cord as a lock. The pattern used is one of my own creations, so it is not too hard to make :). (But you need to be able to hook!) What you need is two differen colors of wool and crochet hook number 4. I set up 31 stitches (depends on the size of the notebook). Some pictures I took during the process are here, for the work instruction click on the following link: http://imageshack.us/photo/my-images/863/partiiworkinstruction.jpg/


Is hij niet schattig :)? Ik ben een fan van de Birkin-bag, maar natuurlijk is die veel te duur voor mij haha ;)! Maar dat maakt niet uit, want ik heb vandaag een Birkin-bag look-a-like gemaakt van mijn notitieboekje :). Hij is gehaakt met wol en afgemaakt met katoen en een key-koord als sluiting. Het patroon heb ik zelf bedacht, dus is niet al te moeilijk om na te maken :). (Je moet natuurlijk wel kunnen haken!) Je hebt twee kleuren wol nodig en haaknaald nummer 4. Ik heb 31 steken opgezet in het begin, maar dit hangt natuurlijk af van de breedte van je notitieboekje. Hier onder zijn wat foto's genomen tijdens het maken. Het werkplan vindt je door op de volgende link te klikken: http://imageshack.us/photo/my-images/863/partiiworksinstruction.jpg/


vrijdag 27 mei 2011

DIY: The Notebook PartI - The Beginning

A creative mind can not live without a creative notebook in my opinion :). I already told you that I used my WTJ as a creative journal of my mind... but there is no space left in it. So I needed a new one :). This is the first part that I will show you of my new notebook... or actually it is a bag-book :D! I can take it with me everywhere I want... even if I am not carrying a real bag :). The instruction shows you how to make yourself such a bag-book. All you need is a simple notebook... a fancy coloured paper bag... siccors and glue :).


Een crea-bea brein kan volgens mij niet zonder een crea-bea boekje :). Zoals ik laatst vertelde gebruikte ik altijd mijn WTJ als opslagplaats voor mijn creatieve uitspattingen... maar dat die inmiddels vol is. Dus had ik een nieuwe nodig :). Dit is het eerste gedeelte van mijn nieuwe crea-bea boek wat ik aan jullie wil laten zien... of eigenlijk is het meer een tas-boek geworden :D! Zo kan ik hem overal mee naar toe nemen, ook als ik geen gewone tas mee heb :). De instructie hieronder laat zien hoe je zelf zo een tas-boek in elkaar kan zetten. Wat je nodig hebt is een leeg notitieboek... een papieren tas in een leuke kleur... een schaar en wat lijm :).

The Instruction :)!

woensdag 25 mei 2011

DIY: The Studded Bracelet


When I woke up this morning I had about a hundred things in my head to make... but none of the materials of course ;)! So I went to my so-called atelier and searched through some old boxes and found an old tobacco can of my grandma. Curiously I opened it and it was full with studs and other hardware :). Last year I bought some rope, didn't know what to use it for... but it was so cheap... and now it came in handy! I decided to make a bracelet :). Did some try-outs... but the end result was the one here on the picture :). Because it was really easy to make I have included a description to DIY ;)! I like it, but do you?


Toen ik vanmorgen wakker werd stroomde mijn hoofd weer eens over van ideeen... maar geen van allen uitvoerbaar wegens gebrek aan materiaal ;)! Dus ben ik maar weer eens gaan neuzen in de oude dozen en manden in mijn 'atelier'. Ik vond een oud tabaksblik van m'n oma. Uit nieuwsgierigheid was die snel open en hij bleek vol te zitten met studs en allerlei andere hardware :). Vorig jaar had ik een paar meter touw gekocht, geen idee waarvoor ik het nodig zou hebben, maar nu kwam het goed van pas! Ik heb uiteindelijk een armband gemaakt... en het resultaat is te zien op de foto :). Omdat hij heel makkelijk te maken is heb ik hieronder een instructie toegevoegd zodat jullie hem ook kunnen maken ;)! Ik vind hem leuk, maar wat vinden jullie ervan?


The instruction :)! Good luck!